Since my son Jaden and I put our picture book out into the world, we’ve had a heap of people ask, ‘How did you do it/what was the process?’ I said I’d write a blog post detailing the process if there was enough interest and, well, it seems there are a lot of fellow budding picture book writers out there in the world.
So, for your reading pleasure, what follows here is how we did it. We’re not saying, ‘This is how you should do it,’ as I’m sure we broke many ‘rules of writing a picture book’ along the way. But we’re pretty happy with where we got to, so we must have done at least a few things ‘right’ ?
Here’s what we did:
Step 1 – The manuscript
Jaden came into the kitchen one morning with a book he’d just penned and illustrated on a whim. It was called ‘Clanky’s Awful Life Story’ and went like this:
In 1991 Clanky thought war was fun
In 1992 Clanky did a poo
In 1993 Clanky hugged a tree
In 1994 Clanky went to war
In 1995 Clanky’s eyes weren’t alive
In 1996 Clanky’s legs turned into sticks
In 1997 Clanky’s arms went up to heaven
In 1998 Clanky hasn’t met his fate
In 1999 Clanky was fine
In 2010 Clanky’s name is now Sven
And that’s the story of Clanky
It was funny and catchy and we all had a good laugh. And that was it.
But then the next day I heard my five-year-old daughter Mia singing some of the lines to herself while she played and I thought, ‘It’s that catchy, huh?’
It was one of those right place, right time scenarios as:
- I’ve been wanting to do a kids’ picture book for ages, but lacked the necessary imagination
- I was having a very stressful year and felt a low-stakes, creative project might buffer some of that stress
- I’d just decided against us taking a very expensive family holiday to Melbourne where the flights alone were going to cost $3500. We had the money, but I felt we could take a cheaper holiday within WA and then divert the unused funds towards something that was a little more lasting. To me, working on a picture book with Jaden and showing him how an idea could be developed into something tangible and lasting was a good way to use those funds!
So it was decided right there and then: ‘Let’s turn this into a real picture book!’
The first thing we had to do was tweak Jaden’s manuscript. As someone said to me, ‘It was full of eight-year-old anarchy’ and while eight-year-old boys would certainly find it funny, eight-year-old boys don’t read picture books. But five-year-olds do.
So we, (myself, husband Ant, Mia and Jaden) got busy tossing ideas around. We wanted it to be rhyming like Jaden’s version as that version was catchy and fun. But the rhymes had to work for five-year-olds.
Oh, the other thing we knew was the standard picture book was 32 pages, but by the time you took into account the front and back covers, inside covers, dedication page, publication information page and title page, you didn’t need words for 32 pages, it was more like 25 pages. (Download a template here.) We knew we wanted each line to be a whole spread (two side-by-side pages) of the book so we were aiming for 12 lines + a way to wrap things up neatly on the final page.
When coming up with the new lines for the book, we tested them all on Mia and if something didn’t make sense to her, it got consigned to the cutting room floor.
After a bit of work, we settled on this version of the manuscript. We did end up tweaking it midway through the illustration process, but I’ll talk about that later.
Once we had a manuscript we were happy with, it was time to find an illustrator.
Step 2 – Finding an illustrator
One thing I learned throughout this process is that there’s a big difference between ‘someone who can draw well’ and an experienced illustrator. And there’s also a big difference between an experienced illustrator and a children’s book illustrator. Goran, who we eventually selected as our illustrator, is an experienced children’s book illustrator, and a large part of why the book turned out so beautifully is because of his experience.
How did we find Goran? We advertised for an illustrator on upwork.com. Here’s the exact ad we posted:
Clanky is a character conceived by my son. Attached to this job is his drawing of Clanky. We want to make a picture book featuring Clanky. We want the book to make people laugh and the illustrations will be key to this. We’re not thinking heavily detailed colour illustrations, we’re thinking more black line illustrations like the samples attached.
We are looking to hire an illustrator for our book. We will be selecting three people to illustrate two pages for us as a (paid) test job. From there we will select the illustrator for the whole book.
If you are interested in being one of the illustrators we engage for a paid trial, please apply and include samples of line drawing style illustrations you’ve done along with an indication of your rates.
(Side note: It’s interesting to look at this job post and compare our initial vision for the book, (‘We’re not thinking heavily detailed colour illustrations, we’re thinking more black line illustrations’) versus how it turned out.)
Within a few hours of posting the job on Upwork we had over 80 applicants. Eep! We quickly closed the posting once it hit that mark. Then came the job of going through the applications to create a long list. The criteria I used to create this long list was:
- Does this person communicate clearly?
- Did they do what I asked in the ad? (Include samples of line drawing style illustrations you’ve done along with an indication of your rates.)
- Do I like their illustration style? (Another thing I’ve come to realise is, every illustrator has a unique style and you’re going to get the best results if they’re able to stick to their preferred style.)
Once we had a long list of 12 or so illustrators, our goal was to get it down to three. In the end we selected four illustrators to do a paid test job because I couldn’t split them.
For the paid test job:
- Initially, we asked for line drawings only. (Because that was our original vision for the Clanky book – that it would have a Diary of a Wimpy Kid feel to it.) But then one of the illustrators sent through a colourised version of their drawing. And it looked amazing. So we then got all but one of the illustrators to colourise their drawings. (I can’t remember why we didn’t ask for the fourth to be colourised … it might have been a timing thing.)
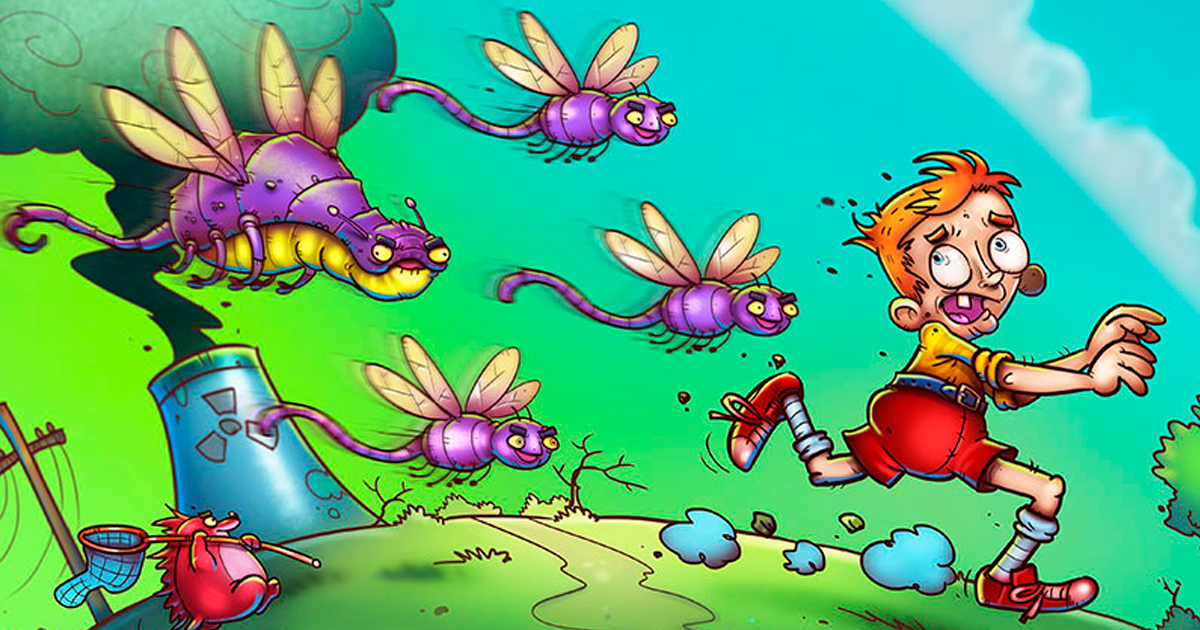
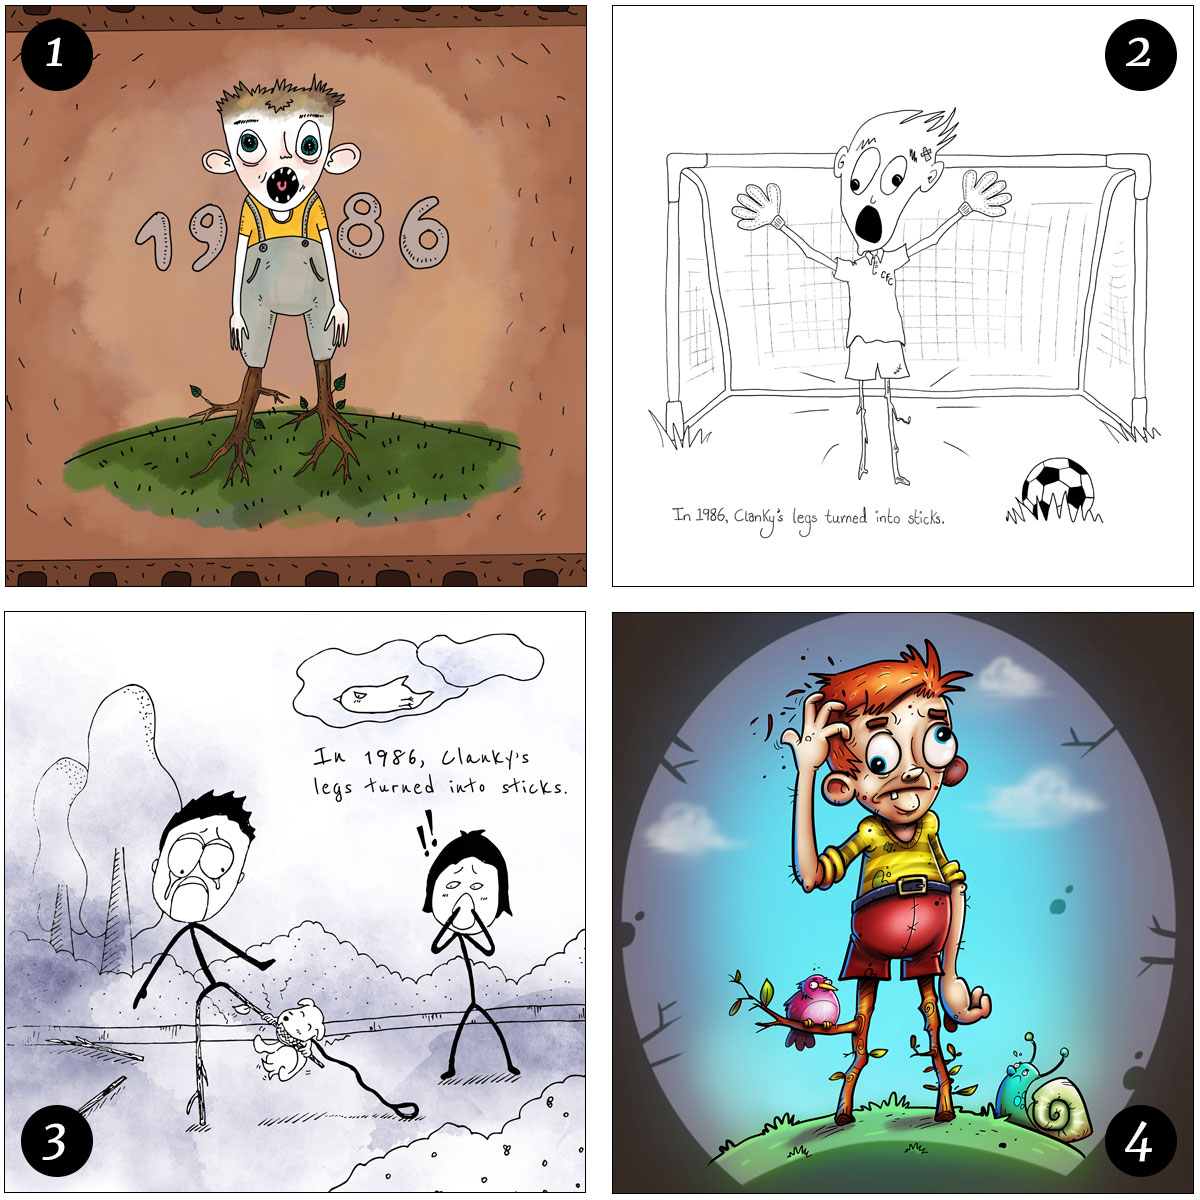
- Initially each illustrator chose the line from the book that most appealed to them and drew that. In the end we asked them all to illustrate the same page (Clanky’s legs turned into sticks), so we could compare them more easily.
In addition to paying for the test concepts, every time we asked an illustrator to do a bit more, (change the drawing to a different one, colourise the drawing), we paid for that extra work. In all we paid around $350USD for the test concepts and it was money well spent.
Step 3 – Selecting the illustrator
So, we had our test concepts.
But which one to choose? There was something appealing about all the illustrations:
- We loved the kookiness of #1.
- #2 demonstrated an ability to convey real humour in her sample drawings (she sent through a few) – something I was attracted to because we wanted the book to make kids laugh.
- #3 was closest to our original ‘stick figure’ idea of what Clanky would look like.
- #4 was furthest away from our original vision (being quite realistic), but had a level of sophistication and style that we really liked.
In the end, we (myself, Ant, Jaden (8) and Mia (5)) all had our preferences, but we didn’t go with our preferences. We asked the target audience (kids in Mia’s class) which they liked most. And they were unanimous in liking #4 – which was Goran’s concept. So Goran got the job!
Note: For all that we were champing at the bit and keen to get going and choose our illustrator FAST, we let this process take as long as it took. (We had to give the illustrators a proper amount of time to get their concepts done and back to us.) In all it took around three weeks from first posting the ad to selecting Goran.
Step 4 – Working with the illustrator
Next step in the process was producing the illustrations for the book. The fun bit!
Before you can start, you need to know what size your book pages are going to be. While some sizes are more standard than others, you can make your picture book whatever size you like. The size we chose was 8.5” x 8.5” (the largest square size available via Ingram Spark – the print-on-demand provider we’d decided to use).
The second thing you need to agree on with your illustrator is pricing. Goran let us know his price was $60USD per colourised double-page spread and $30USD per colourised single-page spread.
The third thing to agree on with your illustrator is who owns the rights to the artwork and what book credits will apply. Goran agreed to assign rights to the artwork to us once it had been paid for. (All that means is we own the final artwork and can use that artwork in any way we like. For instance, on a website or in promotional material. Goran retains copyright of the artwork as the creator of the work.) With regard to book credits, Goran would be credited on the cover and in the book as the illustrator of the book.
Once all that admin stuff was out of the way, it was time to create a series of milestones in Upwork. This ensured Goran would be paid for his work in small increments along the way. Doing it this way ensured Goran was not taking the risk of completing all the work for us, only for us not to pay him. And it also incentivised him to keep the project moving and deliver on deadlines. (Not that he needed incentives because he is a pro.)
The first milestone was to create one complete double-page spread for the book. This was to get a feel for the process. And the process was:
- Goran would sketch the spread.
- We would provide feedback about anything that needed to change, and he’d amend the sketch where necessary.
- Once the sketch was approved he’d properly draw and colourise the spread. (NB: If we wanted to make changes to the spread once we’d approved the sketch and he’d started working on the ‘real’ version, there would be an extra charge.)
Once that first spread was sorted, the milestones went like this:
- Complete 11 remaining spread sketches
- Complete line art and colouring of 5/11 spreads
- Complete line art and colour of 6/11 spreads
- Complete sketches, line art and colouring of front cover, back cover and final page of book
With regard to exactly how Goran illustrated each spread …
I’ve been told you should just let the illustrator do their thing and bring each line to life in they way they feel best. I feel that’s asking the illustrator to carry a huge load creatively if they first have to conceptualise what the character is going to be doing, and then illustrate it. Also, I had some specific ideas for what I felt Clanky should be doing for certain lines of the book. Where I had a vision for a particular line in the book, I’d tell Goran something like:
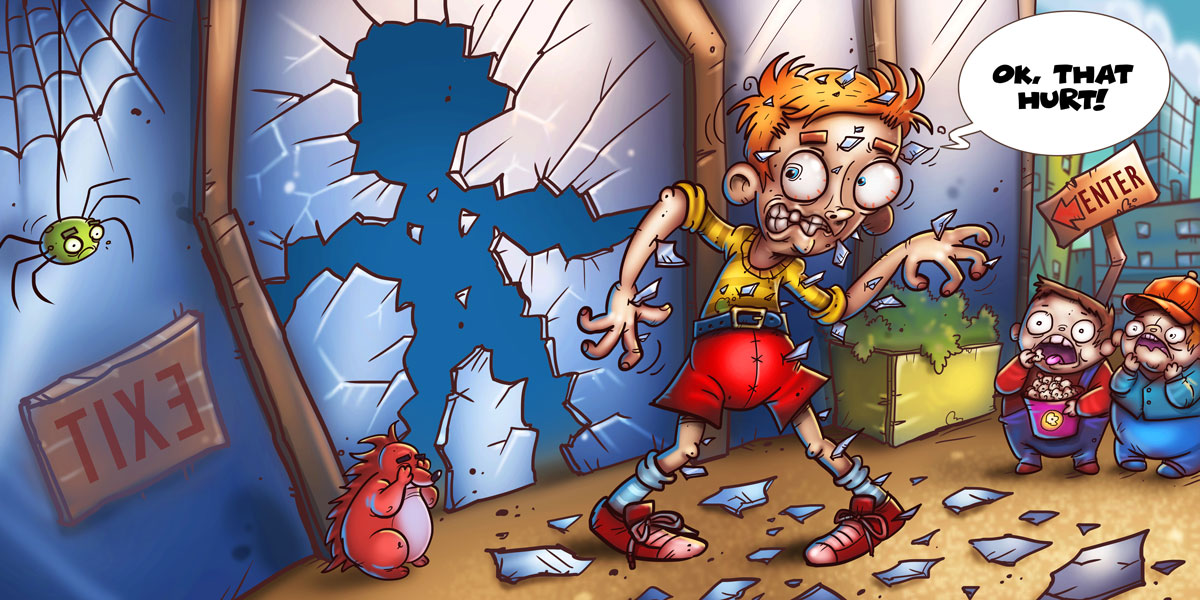
For: In 1984, Clanky ran straight through a glass door
I’m envisioning: Clanky on the other side of a glass door that has a Clanky shaped hole in it, and there are shards of glass flying everywhere and Clanky is cut up a bit. Speech bubble: “Ok, that hurt”
If I had no ideas for a spread, I’d say, ‘I have no ideas for this, what do you think?’ And he’d give me some ideas verbally to see what I thought before he started sketching.
Sometimes, I’d pull together some simple clipart to illustrate what was in my head and it was fun to watch that rudimentary brief go …
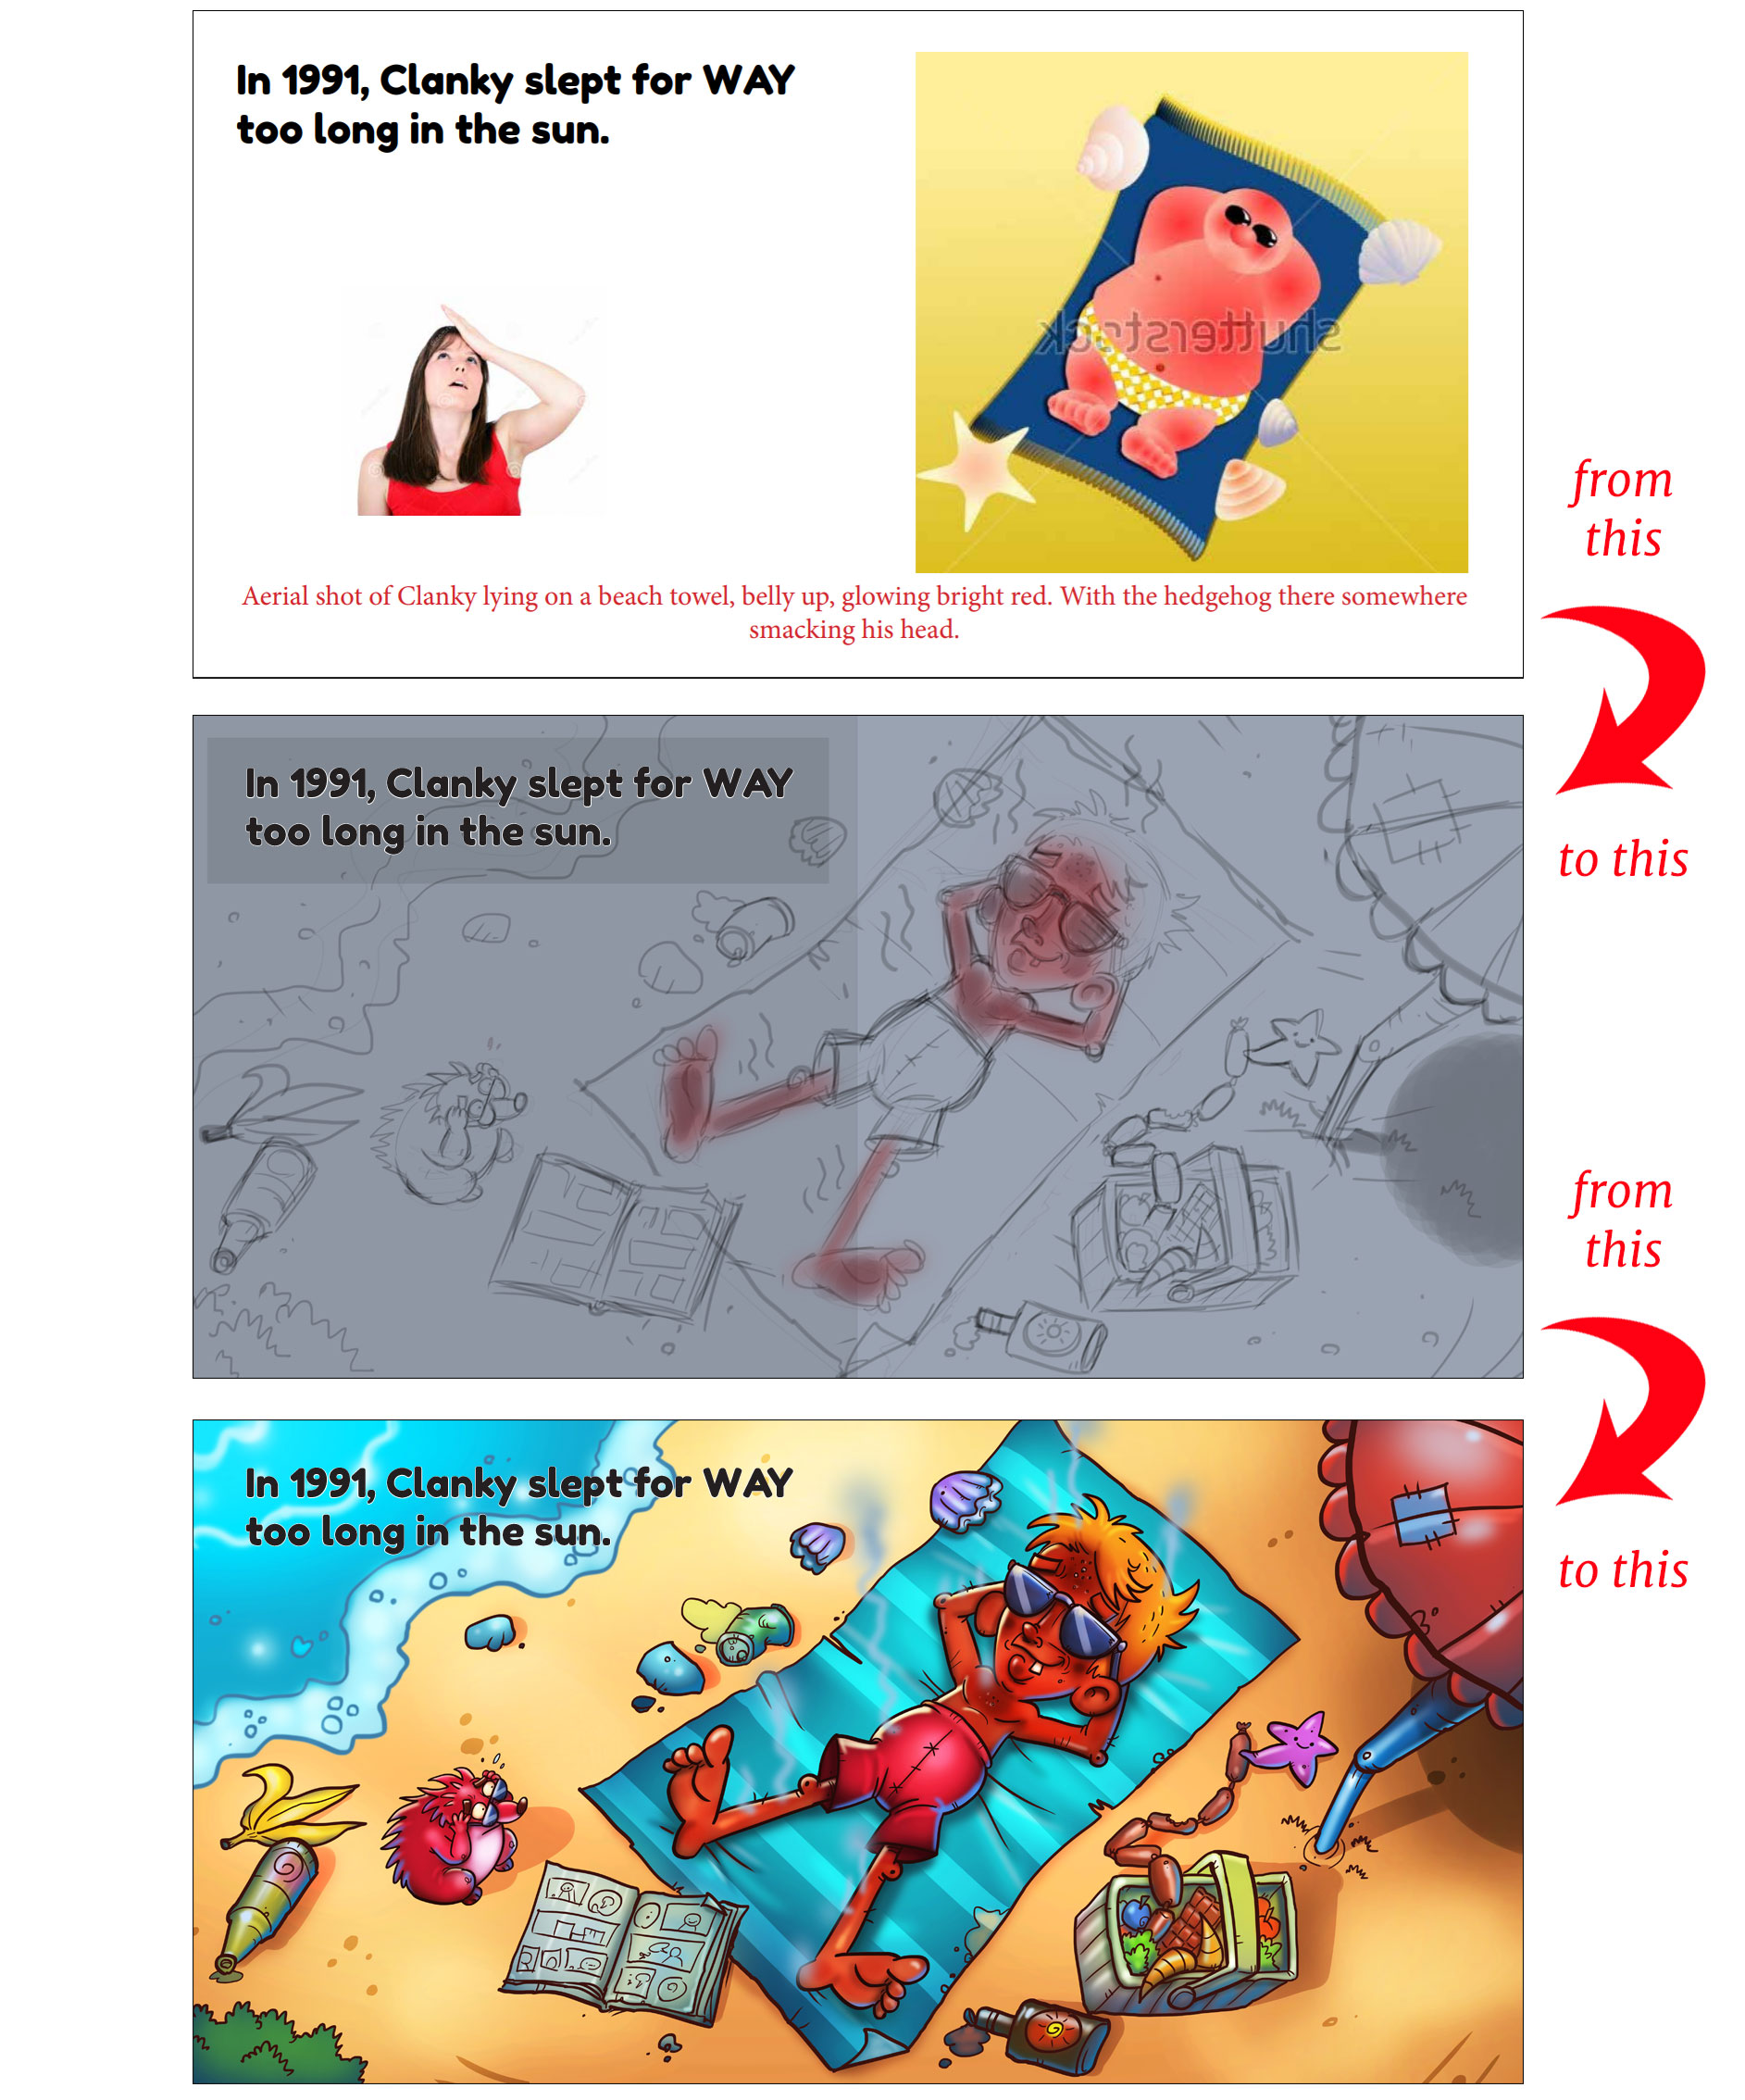
Essentially, anything I could do to reduce guesswork on Goran’s part and help him hit the mark with the first sketch, I did it. This also sped up the process by reducing the amount of back and forth we had to do. In the end, the only tweaking I ever did of sketches was to Clanky’s facial expressions. If Goran had a vision for a particular line that didn’t match mine, he’d tell me. And I always deferred to what he thought.
All up the illustrations for this book cost $990USD.
The front cover, back cover and final page were all single-page spreads at $30USD each.
The main part of the book had 12 spreads, but we changed the manuscript halfway through and had to re-do three spreads. The 15 double-page spreads were $60USD each.
Time-wise, getting the illustrations finalised took around two months.
Step 5 – Getting professional advice on the manuscript
Despite the fact that Goran was already working on it, I knew the manuscript wasn’t quite right. It didn’t have a beginning. And Goran felt the original ending, which took the reader somewhere and then left them hanging (‘What happens next? We’ll tell you in the next book.’) was a no no.
So I started crafting an elaborate backstory for Clanky and even adding pages when I knew full well picture books only have 32 pages. Jaden kept vetoing all my backstory stuff as ‘lame’, and in the end, I got so tangled up I realised I needed some professional help. So I put a callout in a Facebook group for a picture book editor.
I got connected with picture book author Charlotte Calder (thanks Kate!) and she was so amazing. She told me 3-7-year-olds (the target audience for this book) don’t need a backstory. A simple ‘This is Clanky, he’s led a very weird, hilariously awful life’ type beginning was all that was needed.
She also pointed out that a few of the original spreads:
- Clanky being used as shark bait
- Clanky’s arms going up to heaven
- Clanky getting zapped with a stun gun
might not go down that well with the target age group, or the parents and teachers who’d be reading the books to the kids!
In the end, it took a bit of trial and error, but I was eventually able to tweak the manuscript so that it had a beginning, middle and an end that made sense. And most importantly, that Jaden didn’t deem ‘lame’.
Step 6 – Designing the book
This is the bit where it was helpful that I’m also a graphic designer. I didn’t have to pay for this bit ?
If you do have to pay for it, expect to pay for 6-10 hours of work at $100/hr (at least). Even though the illustrator is doing most of the heavy lifting from a design point of view, there is design and art direction involved in:
- The front and back cover
- Title page
- Publisher details page
- Choosing the right font and placement for the book text
- Preparing it correctly for print
I know I’m biased, but I wouldn’t scrimp on the designer here. An experienced designer will know the right questions to ask to ensure the book is produced and output correctly for print. They will ultimately save you time, money and frustration.
Step 7 – Printing the book
There are many ways you can get a picture book printed.
- Local printer (usually expensive, especially at small quantities)
- Printer in China (risky, takes a long time, and only worthwhile if you are printing thousands of copies)
- Print-on-demand provider like Amazon’s CreateSpace or Lightning Source’s Ingram Spark (where the cost per book is the same whether you print one book or 1000)
I’ve used both CreateSpace and Ingram before. I chose to go with Ingram in this instance because they have a printing presence in Australia while CreateSpace doesn’t (their books come from the US). If you print something with CreateSpace, it can often be cheaper than Ingram, but then the shipping costs from the US to Australia wipes out all the savings you might make.
Ingram offers a handy calculator on their site to help you figure out what your book will cost to print and ship to you. Here’s an image showing the settings I used for the Clanky book. You will note:
- I chose Premium Color over Standard Color 70 and Standard Color. Because this is a picture book I felt it was important to have the highest standard of colour. For the record, if printing 100 books, the difference pricing between the three colour options is $609.76 vs $482.49 vs $449.16. Is the difference between Premium Color over the other two worth it? Only you can decide. If you ask Ingram, they will send you samples so you can compare.
- I chose a Matte cover over a Gloss cover. This is a personal preference thing. I just like Matte better. Many picture books do have gloss covers, however, as gloss is more hard wearing.
- I chose not to have a duplex cover. If you have a duplex cover that means you can print on the inside covers as well as the front and back covers. I didn’t feel this would make our book any better to look at or read. So, despite it only increasing the price per book by ~40c, I didn’t do it. I might change that in the future though.
- I chose saddle stitch over perfect bound. (NB: It didn’t actually give me that option when I went to create the sample settings linked above. I don’t know why.) Our book is saddle stitched (stapled) because this lets the spread sit flat. That was important for us because key parts of our illustrations cross the middle of the two-page spreads. If key parts of your illustrations don’t cross this area, then perfect bound (the way most paperbacks and magazines are bound) is fine.
- The page count of the book is 32 pages. Really, it should be 28 pages because the cover pages (Front cover, inside front cover, inside back cover, back cover) are not included in that number. But Ingram need to have two blank pages at the end of the book in order to print their barcode in the book. This meant I had to add four pages at the end of the book. Two were these, and two were blank.
Preparing your book so it’s print-ready and able to upload into Ingram requires professional graphic design knowledge and skills. This is where and when the money you pay for a pro designer becomes money well spent.
FYI, when your designer is creating the back cover of your book, they will need to know your ISBN. You get your ISBN from Bowker. Once your designer knows your ISBN, they can use the Ingram cover template generator to generate a template that shows the barcode, the cover dimensions and the live areas for the cover. (If your designer doesn’t know what ‘live areas’ of a cover template means, get a new designer.) CreateSpace also offers a cover template generator but their template doesn’t include a barcode. You will need to purchase a barcode file from Bowker if using CreateSpace.
Once your file has been uploaded to Ingram (or CreateSpace), checked by them and approved, you can order a single copy to be sent to you to check the quality and that everything looks as it should. If you’re not happy, you can get your designer to make adjustments. If all is good, you’re ready to press ‘Publish’.
Step 8 – Publishing your book
Ingram Spark and CreateSpace are both book distributors. Once you tell them your title is available for distribution, they will push it out to the stores they are aligned with. For Australian authors, Ingram is the only way to make a paperback book available via the Australian Amazon store. They also make your book available to retailers including all the overseas Amazon stores, Barnes & Noble, Book Depository and Booktopia. (You can see a more comprehensive list here.)
It’s important to note that just because Ingram makes your book available to these retailers, that doesn’t necessarily mean they’ll stock them. But Amazon will certainly pick them up and display them online.
You can also purchase your book directly from Ingram at author pricing, and then sell the books on your website or at book events (or wherever). This is the best return you’ll get on your book sales.
We can purchase the Clanky book for ~$6/copy via Ingram. When we sell it for $12 on our website ($12 + $3 shipping in Australia), we make $6/book.
If a retailer buys our book from Ingram to stock in their shop, this is what we make:
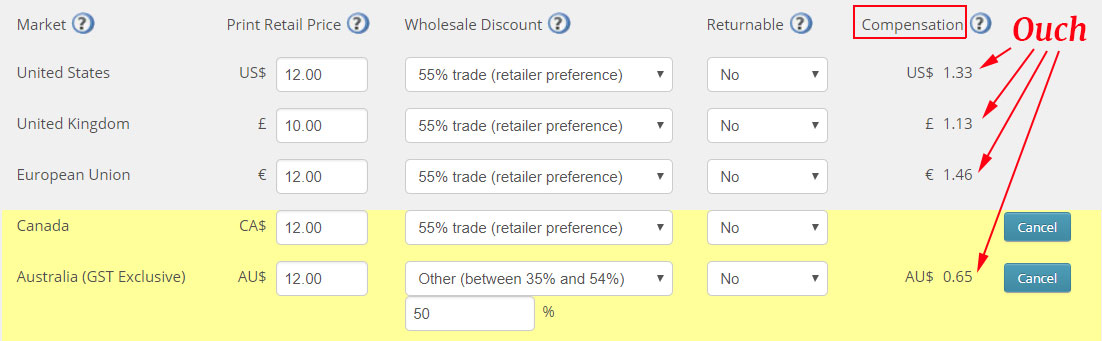
Which leads me to …
The economic reality of picture books
As with all books, you don’t do a picture book to make money!
So far we’ve spent:
- $480 AUD ($350USD) on getting test illustrations done
- $1350AUD ($990USD) getting the full set of illustrations for the book
- $539 AUD printing 100 sample copies to send to friends, family, influencers and kids in Jaden’s and Mia’s classes (via a local trade printer who we get wholesale prices through because we have a graphic design business)
- $200AUD mailing copies to friends, family and influencers
- A total investment of $2569AUD
To make back that investment, we need to sell 428 books at a profit of $6. (I think. I’m sure Ant will correct my maths here if it’s wrong!)
It’s quite difficult to sell that many books. To date we’ve sold around 50. Admittedly, we’ve only done the softest of launches thus far. The proper launch will come. But if we spend any money on that ‘proper launch’ then the number of books we need to sell to make back our investment goes up. So that’s something to consider.
For us, the main aim of this project was to have some fun. I had money set aside to have that fun and really enjoyed working through the process with Jaden. It was awesome to show him what was involved in taking an idea through to the creation of something really tangible. And he got to be a published author shortly before his ninth birthday. Nice. Also, it was a project everyone in our family could get involved with and we all enjoyed having input along the way.