
BACKUP
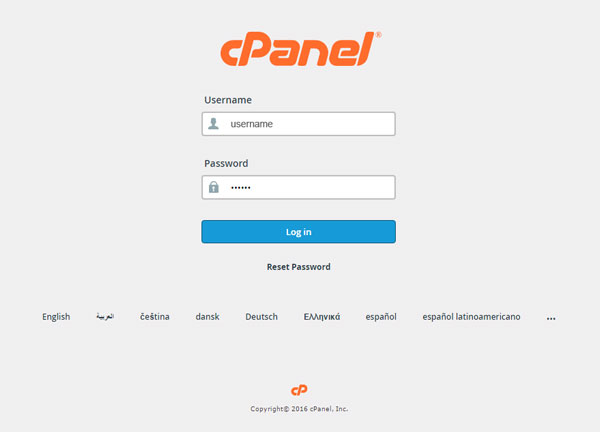
Step 1: Login in to your cPanel account
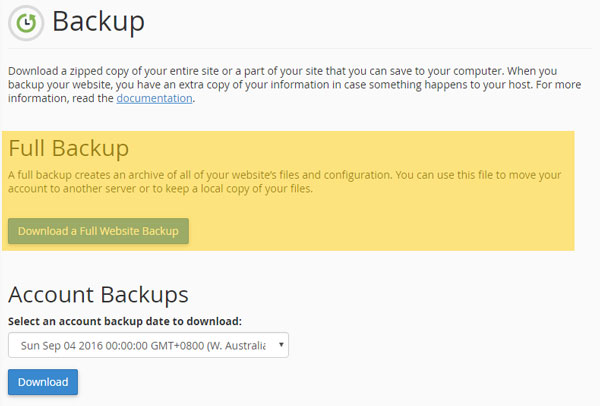
Step 2: Go to Files > Backup

Step 3: Click ‘Download a Full Website Backup’
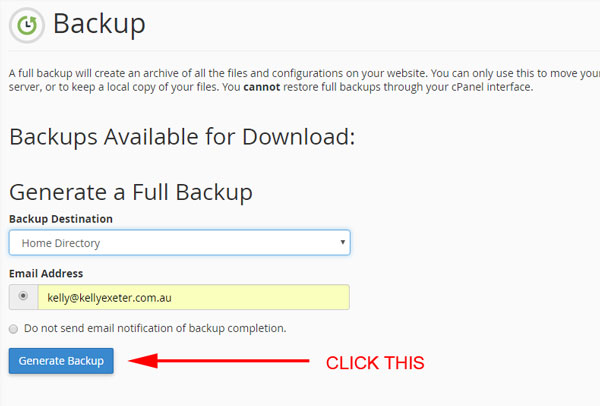
Step 4: Click Generate Backup
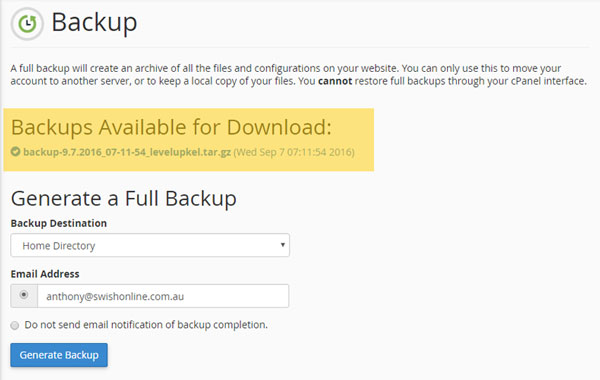
Once the backup has been generated you will receive an email notification telling you it’s ready for download.
Step 5: Log back in
Then go through Steps 1-3 above and you will see a .tar.gz file under “Available Backups To Download”
Step 6: Download that backup
Right click on the link to the backup and ‘Save Link As’ to somewhere on your computer
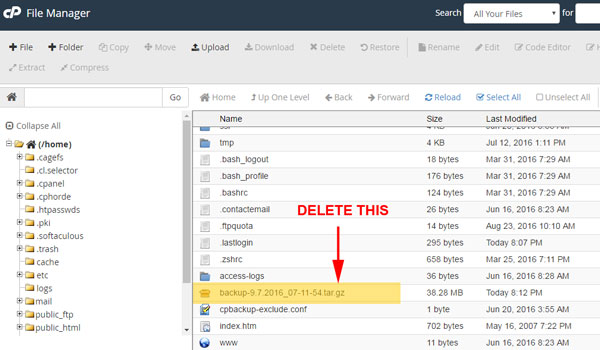
Step 7: Delete it from your home directory
We told the system to save the file to your home directory, which means it’s being stored on your web server. If your website is small, this won’t be a problem. If your website is massive, it might take up all your storage space. So once you’ve downloaded the backup file:
- Go to your cPanel home
- Go to Files > File Manager
- Locate the backup file in your home directory (this directory should come up by default)
- Delete the backup file
PERFORMANCE
1. Check your image sizes
If a website is running very slowly and images in particular are taking a long time to load, then it’s probably because you are uploading images that are too big.
There are two ways images can be too big:
- The dimensions – the pixel size of each edge
- The file size – in KB/MB
Don’t load images into your website straight off your phone or your camera. Open them up in a program like PicMonkey or Photoshop and resize them/optimise them for web first, then load them into WordPress. It might seem painful to do this, but this will have SUCH a significant impact on your website speed, it would be silly not to do it.
Other thing worth knowing
- If your site is full of giant images, WP Smush It is an easy way to adjust all those image sizes.
2. Use a caching plugin
When someone visits one of your pages, they need to request a lot of information from your web host. They need to send a request for images, Javascript, and CSS. They also have to retrieve your content from the WordPress database. All of this contributes to your total page loading time.
A database powered platform, such as WordPress, generates content dynamically. This means that it requests fresh information about a page every time a visitor views a page. This can be unnecessary as when an article has been published, it only changes when an administrator, editor, or author, goes in and modifies it.
Caching plugins address this issue by creating a static version of your content and delivering it to visitors. This can reduce your page loading time significantly. You could see an improvement in overall website performance of around ten times.
The only problem I have found with caching plugins is that they do tend to conflict with other plugins. If you install a caching plugin and things break on your site, you might need to use Cloudflare instead.
The caching plugin we prefer is W3 Total Cache.
Other things worth knowing
- I have found in the past that caching plugins is they do tend to conflict with other plugins quite frequently.
- Good resource
3. Check the number of plugins you have
Plugins are great because they are what allow WordPress to be infinitely extended. And there are over 40,000 plugins to choose from in the WordPress Repository – so pretty much anything you want to do on your site, there is a plugin for it.
The only problem is, every plugin you install has the potential to slow down your site. Why?
Plugins impact site performance in two distinct ways:
- Additional HTTP requests.
- Additional database queries.
Basically, these are requests to your server. Let’s say every time a page load on your site there are 30 requests being made of your server. If you’re only got one or two people trying to access your site at any given time, then this isn’t going to be a huge problem – 60 requests is a lot but your server can handle it.
If you share your post on Facebook however, and 100 people all go to read your post at once however, you suddenly jump from 60 requests to 3000. This is a problem. Your server won’t be able to deal with all the requests and you’ll get a ‘Resource exceeded’ error, the site might go down … or in some cases, you can take the whole server down.
So, is there an ideal number of plugins?
We recommend no more than 20 – but really, the answer is, it depends. Different plugins call on different server resources. When it comes to plugins we simply recommend:
- Using as few as you can
- Only ever using highly reputable plugins – plugins that are being updated constantly, and have a high number of downloads. If they are being updated, then that means that any known conflicts are being addressed.
The other way plugins can cause performance issues is that they can conflict with each other. If your site is breaking or performing badly, is there a way to figure out which plugin is causing it? The best way is to turn all of them off, and then turn them back on one by one.
You can also install P3 (Plugin Performance Profiler)
4. Themes
Does the theme you choose affect performance. Yes, it does, but to be honest, most of the paid WordPress themes out there these days are pretty good.
Where is the best place to get WordPress themes? From places that will give you good support.
- Studiopress (Genesis themes)
- BlueChic
- Themeforest
When looking in Themeforest always look for:
- The rating
- Sales
- Support
- Comments – and see if their support team are answering the comments
5. Cloudflare
It’s hard to explain exactly what Cloudflare does but suffice to say, if your blog gets any kind of decent traffic, it’s well worth setting up Cloudflare as the service does a heap of things to minimise the loading time of your website, which is especially handy when your website is under a high traffic load.
SECURITY
And when we talk about security, the main thing we’re talking about is preventing your site from getting hacked.
Why would hackers want to hack your site?
- To steal user information
- To spread malware
- To redirect people to other sites
- To use your site to attack other sites
- For SEO (they insert links into your site to act as backlinks for other sites)
- To host objectionable content
- For fun
Why is it undesirable if your site gets hacked?
- Google will blacklist your site and prevent people from accessing it
- Your site might not perform properly or display properly
How do hackers get into a site?
- Accessing via ftp (effectively guessing your hosting FTP password)
- Via your WordPress theme (via known vulnerabilities)
- Via a plugin (via known vulnerabilities)
- Via WordPress admin (having a weak password)
What you need to know about hacking
- Prevention is the best cure
- It is a giant pain in the ass to repair a hacked site
- You could restore it to an old backup – but the hack code might have been injected into your site a long time ago. So the old backup will contain the same hacking gateway.
Five things you can do to make your site hard to hack
NB: If someone really wants to hack your site specifically, there’s nothing you can do about it unfortunately.
These tips are like locking the door of your home and turning on the alarm. If a thief still wants to break into your house, they can do it. But why would they when there is lower hanging fruit out there? ie sites that aren’t as well-protected as yours.
The thing with WordPress sites is that there are things common to the vast majority of them. Hackers exploit these known things. So if you are able to make your website the exception, not the rule, then hackers are unlikely to bother with your site because you’ve made things just that little bit more difficult for them.
1. Keep WordPress, plugins and themes updated
Security holes in themes and plugins represent more than half of all successful WordPress hacks. You therefore need to pay attention to the plugins you activate on your website.
- Be ruthless when it comes to plugins. If you can do without the functionality a plugin offers, deactivate it and remove it.
- Be wary of plugins that have not been updated within the last year as they may have security holes in them that have not been addressed. If possible, only use plugins that are updated regularly.
- All plugins are not created equal. Be conscious of the fact that a poorly coded plugin could make it easier for a hacker to gain access to your website.
- Be discerning when it comes to installing plugins on your site. Only choose plugins that have a large number of downloads (preferably in the tens of thousands) and a 4-5 star rating.
It is important that your WordPress theme is up to date and well-coded, too. You can check the quality of the code in your theme using a plugin such as Theme-Check and check the code in plugins using Plugin-Check.
You should also be careful of downloading free WordPress themes from unknown sources as they may contain malicious code.
If in doubt, stick to the free WordPress designs available at WordPress.org.
2. Change your admin username from admin
By default, when setting up a WordPress website, the admin username is … admin.
Of the 75 million odd sites out there using WordPress as the platform, at least (and I am being generous) 74 million of those would have admin as the login username. Don’t be one of the 74 million.
There are three ways to change your admin username and they are outlined in this WP Beginner post.
I strongly recommend backing up your site first just in case you stuff something up.
But you shouldn’t stuff anything up. I’ve not used the plugin they recommend so I don’t stand by that.
Of the three methods – the first is the least ‘techy’.
3. Hide your login page
By default, you can login to any WordPress site via:
Changing the address of your login location is one of the easiest and most effective things you can do. Simply use the plugin Rename wp-login.php
But keep in mind – by default this will change the address for your login page to:
Don’t use the default!
4. Limit login attempts via a plugin
Hackers use brute force attacks to try and gain access to your WordPress admin area; continually trying new random usernames and passwords. One of the best ways to protect your website against this kind of attack is to install Login LockDown or Login Security Solution. These plugins allow you to limit the number of login attempts from a given IP range.
You can also install the Captcha plugin which adds a maths problem to your logins and contact forms.
5. Get a Cloudflare account
As mentioned already – Cloudflare is great because it is website performance and security in one place.
What about Sucuri? Sucuri’s strength (I feel) is repairing a site once it’s been hacked, especially if your site has been blacklisted. Given their cheapest plan is $200/year, and given it would usually cost at least $200-300 to get a hacked site fixed, Sucuri is where I send people if their site has been hacked.
As a preventer, however, I would use Cloudflare
Scanning your website
- Ultimate Security Checker Is one we’ve used for a long time.
- https://wordpress.org/plugins/gotmls/ is the one we’ve recently moved to
- Wordfence – good but uses a lot of server resources.
SUMMARY
- Always keep your version of WordPress, themes and plugins updated. SO important!
- Optimise your images and use Cloudflare to boost performance
- Turn off and delete any plugins you are not using – also boosts performance
- Use strong passwords for your cPanel login, FTP login and WordPress admin login
- Make your site that little bit harder to hack into than the millions of other WordPress sites out there.